Sunday 1 December 2013

Introduction to Music Production (Coursera)

I just finished another course at Coursera: Introduction to Music Production by Loudon Stearns of Berklee College of Music.

The most demanding stuff from this course were the assignments, in which we had to create short lessons explaining some of the concepts that we learned each week. I went for the screencast mode of teaching, and these are the assignments for each week. Doing the assignments was hard work, but I learned a lot that way, and I hope I can take another music-related course from Coursera in the near future...

Week 1: Topic: "Typical recording signal flow using your own equipment"


Week 2: Topic: "Efficiently create a compile from multiple audio recordings in your DAW."


Week 3: Topic: "Submix practical: Demonstrate the configuration of a Submix in a DAW or physical mixing board and Parallel effects practical: Demonstrate the configuration of parallel effects in a DAW or physical mixing board."


Week 4: Topic: "Demonstrate how to use a specific compression plugin, including threshold, ratio, attack, and release. Describe what visuals the device has, including gain reduction meters, transfer functions, and gain reduction traces if any."


Week 5: Topic: "Demonstrate the delay spectrum with examples of comb filtering, creating pitches with delays, slapback delays, and synchronized long delays."


Week 6: Topic: "On a synthesizer of your choice demonstrate the usage of these controls: Oscillator waveform, oscillator frequency, filter type, filter frequency, filter resonance, and amplitude envelope ADSR. How are they similar and how are they different from the simple synthesizer used in the video demonstrations?"


Thursday 14 November 2013

Classical guitar progress logging (Nov'13)

Soon I'll have a decent microphone, but for the moment another recording with the crappy one. This month a very nice piece by Julio Sagreras: "Maria Luisa: Mazurka".


Maria Luisa: Mazurka (by Julio Sagreras) from Angel de Vicente on Vimeo.


The video is here.


Monday 4 November 2013

Screencasts with Ubuntu Studio 13.10

For a course I am taking on Music Production at Coursera, I need to do screencasts and upload them to YouTube or similar. Before I forget what I found, I put it here. Some details about my settings:
  • I'm running UbuntuStudio 13.10 with the XFCE4 Desktop Environment
  • The screencast recording application I'm using is Kazam (during my first attempts there was an issue with libx264-123 which was causing Kazam to crash, but luckily for me the bug was solved just a couple of days ago).
  • The video editing software I'm using is OpenShot Video editor.
  • My display has a resolution of 1920x1080.

So, first I just use Kazam to record my screencast. For this course I'm mostly interested in recording the Ardour application, which has lots of information, so I will be recording the whole screen.


The resulting video has a very good quality, and I can edit it with Openshot (though remember first to stop Ardour and to stop JACK, since Openshot is not JACK-friendly). Once ready I can export it with the following settings (just by modifying a couple of things after choosing the Vimeo-HD profile given by Openshot):


The resulting video is of very good quality, and I can upload it to YouTube. In YouTube the quality is still very good, but you have to view it at the right resolution. As far as I know you cannot give a link to the video to stream at 1080p, but you can at least force 720p by adding &hd=1 to the YouTube link.

https://www.youtube.com/watch?v=QGChX3eJ4Zc&hd=1

So that gives a quite nice video quality, and you could have it almost perfect by making sure that your viewers will use 1080p, but this might not be possible due to their bandwith, and in any case there is a lot of information in a full screen, so it is nice to add a little help to focus minds (i.e. zooming).

Zooming looks like it should be quite basic, but I couldn't find any other satisfactory way of doing it than by running Compiz. I certainly don't want to run Compiz in a regular basis, but I installed it and learnt how to activatate/desactivate it just for the recording session. Basically, to install it (taken with changes from http://www.webupd8.org/2012/11/how-to-set-up-compiz-in-xubuntu-1210-or.html), I just did:

sudo apt-get install compiz compiz-plugins compiz-plugins-extra compizconfig-settings-manager

I didn't have to do any of the other stuff suggested in that page. With that in place, I start Compiz by running in a terminal:

compiz --replace

Then I open the CompizConfig Settings Manager and configure the magnifier as per the images below (it was important to de-select the "Enhanced Zoom Desktop", as otherwise this seems to override my preferred Magnifier effect):


Now, when I'm done with the recording, if I want my resources back and I want to get rid of Compiz, from another terminal I type (which I can killl with Control-C after the command has done its magic):

xfwm4 --replace

This will kill Compiz and give me my XFCE4 desktop back.

With all this in place, I can have a very nice indeed screencast. As an example:
http://www.youtube.com/watch?v=6Tts9ob5Dlk&hd=1


Tuesday 22 October 2013

Classical guitar progress logging (October'13)

October log is a continuation of the September one (another exercises for the  Coursera course "Survey of Music Technology". In this case we were experimenting with algorithmic composition. So I came up with this program that creates random (in a controlled fashion) music. The program will create different music every time is run, and this is just an "incarnation" of the algorithm.


Wednesday 18 September 2013

Music production with Linux (part I). Routing sound with Pulseaudio & JACK

I have decided to document some of the stuff that one needs to know in order to make music with Linux and the idea is to write a number of posts covering different aspects of music creation.

The platform I'll be using throughout these posts is Ubuntu Studio 13.04 (64 bits), and first of all I wanted to write here the settings to properly and easily route all the sound generated in the computer.

Many standard applications use Pulseaudio, and only the more musically oriented ones (and not all) use JACK (JACK Audio Connection Kit), so it is interesting to know how to mix all of them together, so let's see some examples:

* Route pulseaudio stuff to JACK, so that we can, for example, listen to YouTube videos while making music with JACK-aware applications.

In UbuntuStudio, JACK Sink and JACK Source module are already installed, so the whole thing is very simple. We can start the JACK server with QJackCtl, and we will see that by default a connection from PulseAudio JACK Sink to system is already done, so JACK will route the audio of any application that goes to PulseAudio JACK Sink to the system for playback.


So now we just have to make sure that PulseAudio application will send their audio to the JACK Sink and all should be set. We do this with pavucontrol (PulseAudio Volume Control), and just select PulseAudio JACK Sink as the fallback output device.


With that in place, we both PulseAudio and JACK applications can live together happily.


 * Routing audio input, for example to record a Skype call

In order to record a Skype call we also need to change the fallback input device in pavucontrol to be PulseAudio JACK Source. With the system -> PulseAudio JACK Source connection in QJackCtl, the microphone data will be sent to JACK Source, and after setting JACK Source as the fallback input device, Skype will get that as the input for the Microphone. At the same time we can record the whole conversation for example with Audacity by also connecting JACK Sink -> JACK Source (JACK Sink will give us the audio coming from skype, otherwise we would only record what is coming from our microphone). As an example:


When this is correctly set, we can add all sorts of extra routing to our audio. For example, in the previous example with Skype, perhaps we would like to add some filters to our voice? We only need to change the routing in QJackCtl, so we do not send the system directly to JACK Source, but we route it through some other module. In the following example, I route it through the application jack_rack in order to apply some basic distortion to it.


I think you get the idea by now...

By the way, in order to get the previous screencasts, I just used Kazam, and again selecting JACK Sink and JACK Source as the devices to record from, as can be seen below:


Thursday 12 September 2013

Rooting and unlocking my new Android mobile phone: LG-E400

Last week I got an LG-E400 for free because her owner was not really taking advantage of all its features. The phone was locked to her phone network, so I had to unlock it and root it in order to make it usable. Since I will likely need again this information in the future, I write down some of the resources used.

First thing was to hard reset it, thanks to this page, and then root it. To root it I tried with SuperOneClick, but I was having troubles. As it turns out the firmware of my phone was V10P, and so the version of SuperOneClick I was using was not able to root it. But thanks to this post by AlexPS I got it rooted without problems (it didn't work using "mono" in Linux or in a Windows virtual machine, so I had to borrow a real Windows PC just for this). 

To unlock the phone from its network, I was looking at pages like http://forum.xda-developers.com/showthread.php?t=1693491 and http://www.emudesc.com/threads/como-liberar-tu-movil-con-sistema-android-100-funciona.413513/, but the method in the second link didn't work, and the first one was for another model and I was not sure it would work, so in the end I went the easy way: just went to CodesIMEIS page, and by using the promotional code "GSM" (I got that info from some Forum I can't remember anymore), the phone was unlocked for 1€ in about 10 minutes. Then to access the Internet, I followed the instructions from my network provider to configure the phone properly.

The next thing was to increase the very small system memory (157MB, where all the applications would go by default), so that I could install more applications. For some reason the installed SuperUser app was giving me trouble, so I updated it before continuing. The next thing was to prepare a MicroSD card to hold the installed apps. Despite what it is said in some guides, I had to partition my 2GB card as 999MB FAT32 (Logical) and 898MB ext2 (Primary), following the advice at http://www.htcmania.com/archive/index.php/t-449048.html  (pictures, etc. go to the FAT32 partition, and the installed applications go to the ext2 partition).

Then, the next thing was to download Link2SD, so I followed Part C of the instructions at http://rootlord.blogspot.com.es/2013/06/how-to-increase-memory-on-lg-l3-e400.html

After that, I installed a number of applications (Angry Birds, Endomondo K-9 Mail, ...), and the internal memory status is quite healthy, while I see that 181MB of application data have gone to the MicroSD card. Bingo!


Classical guitar progress logging (September'13)

August was too hot to play, so I skipped that recording. In September instead of a guitar recording I present this little exercise that I had to do for the Coursera course "Survey of Music Technology" (here I'm not really playing the guitar at all, but learning to mix audio (July's recording and some other sound clips) with MIDI in a DAW, this time Reaper).

Classical guitar progress logging (July'13)

I forgot to update it in July, but this was the piece for July: Summer Souvenir (by Giorgio Signorile):

 
Summer Souvenir (by Giorgio Signorile) from Angel de Vicente on Vimeo.

Thursday 27 June 2013

Classical guitar progress logging (June'13)

This month we had the Music school guitar concert, so I uploaded a part of it. The original sound recorded with my crappy camera was horrible. After massaging it a bit with Audacity it is now just audible, but couldn't get any better. Next time I will try to get a proper microphone...

Music school June'13 Concert (part) from Angel de Vicente on Vimeo.


Tuesday 7 May 2013

Classical guitar progress logging (May'13)

For this month I'm playing Amor Flamengo, by Laurindo Almeida. I think it is the first time that I play something non-classical. Should work on getting it a bit faster and with more rhythm, but here it is what I get so far:


Amor Flamengo, by Laurindo Almeida from Angel de Vicente on Vimeo.

Tuesday 23 April 2013

Classical guitar progress logging (Apr'13)

For this month I'm playing Andaluza (Danza española, n.5), by Enrique Granados (1867 - 1916), with a YouTube partner.

The video used is: http://www.youtube.com/watch?v=suTKOmmoBtw. With the help of youtube-dl (http://angel-de-vicente.blogspot.com.es/search?q=youtube-dl) I get the mp3 file:

angelv@pilas:~/GUITAR-APRIL$ youtube-dl --extract-audio --audio-format=mp3 http://www.youtube.com/watch?v=suTKOmmoBtw

Then I use that one for practice, with the help of audacity. With it, I can use this track nicely for practice by:

  • splitting the stereo track and muting the right channel, which has mostly the sound of the first guitar, which I'm playing. I also normalize the audio, as it has some saturation in a couple of places.
  • using the "Change Tempo" effect, so that I can practice slower, but maintaining the right pitch.

For creating the final video, I created a stereo track and put the YouTube recording in the left channel (after removing its right channel, which is where most of the first guitar was recorded), and myself in the right channel (so it is more or less like I'm playing a duet with Marisa Gomez). The result is here:

Andaluza (Danza española, n.5), by Enrique Granados (1867 - 1916) from Angel de Vicente on Vimeo.


As an aside: For this piece I wanted to try with my Aria Silent guitar but I just found out that the line-in jack in my Dell Latitude E6530 is one of these combined in/out connections. By mistake I bought just an audio splitter where in reality I needed a Headphone and Microphone Jack Audio Splitter, so I had to do it with the Acer Aspire 1810T netbook.


Wednesday 17 April 2013

Presentations with org-mode + beamer

I decided to give a try to creating presentations with Org-mode (and Beamer). In the end I got something that looks nice (though further tweaking will be required).

Webs that helped me to get it:

I also had to do a couple of small changes to the file flashmovie.sty (which is in the in this tar file). The basic theme of the presentation can be seen below and the resulting PDF (in Linux I think the embedded video will work only with Acroread 9.4.1) is this.


Tuesday 19 March 2013

Settings for recording classical guitar

A few days after I wrote Settings for recording a guitar performance I got a new computer, so those settings don't work anymore, so let's write here my present settings for recording my classical guitar in my Dell Latitude E6530, running Xubuntu 12.10.

For the moment I use the internal webcam and the internal microphone. I have the following settings in PulseAudio Volume Control:


  • Output Devices: set as fallback "Built-in Audio Analogue Stereo"
  • Input Devices: "Internal Microphone"
  • Configuration: GF108 High Definition Audio Controller: Digital Stereo (HDMI) Output; Built-in Audio: Analogue Stereo Duplex


I follow these steps:


  1. I record video+audio with VLC:
    • To avoid echo when recording, we put output volume muted.  (PA Volume Control, Output Devices). 
    • To avoid saturation, we put input volume at 20%.
    • We "Open Capture Device", with hardware set as /dev/video0 and hw:0,0
    • The video goes to /home/angelv/Videos
  2. To massage the audio:
    • I open the .avi file generated by VLC directly in Audacity.
    • We amplify the signal (Effects -> Amplify) if needed.
    • We do "Click removal" (in Effects)
    • We do some reverb, using GVerb. Based on http://wiki.audacityteam.org/index.php?title=GVerb I end up with these settings:
      • Roomsize:  50 m²
      • Reverb time:  7 s
      • Damping:  0.70
      • Input bandwidth:  0.75
      • Dry signal level:  0 dB
      • Early reflection level:  -22 dB
      • Tail level: -30
    • We export the audio as .ogg
  3. We then create the video (with OpenShot):
    • open .avi and .ogg files
    • create two titles and put them on the top tracks (one for the title, with style Gold2, and another one for the date, with style Gold Bottom). The size of the text, and its position can be set to whatever suits us with the title advanced options.
    • in the third track, I put the backgroupd image for the title. Right now, I'm using a picture of Mount Teide (MEDIA/Pictures/Izana/pa300001.jpg). We can set the duration of the title, by right-clicking to access their properties.
    • In the fourth track we put the .avi file (muted).
    • In the fifth track we put the .ogg audio file.
    • We add a dissolve transition between the background picture and the .avi file.
    • We add fade outs to the .avi and to the .ogg tracks.
    • Once this is done, we export the video, with the following settings: profile: web; target: vimeo-SD, quality: high.
    • This generates a .mp4 file, ready to upload to Vimeo.

Enjoy!


Classical guitar progress logging (Mar'13)


Again recorded with my "normal" classical guitar, directly with the internal microphone of my laptop, and afterwards just added a tiny reverb with Audacity.

The pieces for this month are Nostalgia by Julio Sagreras, and Study in E Minor by Fernando Sor, and the video is here.

Nostalgia by Julio Sagreras, and Study in E Minor by Fernando Sor from Angel de Vicente on Vimeo.

Wednesday 27 February 2013

Classical guitar progress logging (Feb'13)


I almost didn't make it for the February recording, but here it is. This time I recorded with my "normal" classical guitar, directly with the internal microphone of my laptop, and afterwards just added a tiny reverb with Audacity.

The piece for this month is Electric Guitar Barré, by Bryan Lester, and the video is here.

Electric Guitar Barré, by Bryan Lester from Angel de Vicente on Vimeo.

Saturday 19 January 2013

Adding dynamics to MIDI files

My current setting for creating a MIDI file for practicing duets was not very good, and the resulting files were always poor in dynamics, because it was quite a long and tedious process. So I asked in LAU the following:

"[...] I'm looking for an alternative way for note input. I am hoping for something like the following:

1. I just enter the notes, regardless of the duration of each of them.
2. Then I go into a second phase, where (using the PC keyboard or a MIDI
   keyboard) I just worry about the rhythm (the note durations). Every
   time I press a new key in the keyboard the program would play the
   next note from the ones entered in step 1. and record its duration. I
   don't care about how the score will look with these durations. I just
   want an easy way to create a more musical accompaniment. This way, at
   this step I only have to worry about the durations of each note.
[...]

Is there any MIDI editor that would let me do something like this?"

I ended up following the suggestion of using Pure Data. Despite never having used it, the YouTube tutoring videos by Rafael Hernandez are great, and after viewing the first 10 (about 90 minutes), the impatient guy in me had to code something and I managed to get a proof-of-concept implementation of the above. The code is horrible, and I'm sure it can be done much more efficiently and in a more elegant way (if any reader has suggestions, they are very welcome!), but for the moment this works.

The code itself is available, and  it looks like this:


I'm sure it hurts the eyes of any PureData programmer, but bear in mind that my exposure to PureData has been about two-three hours.


So, how does it work?  First, let's get everything connected (the MIDI keyboard to Pure Data, and Pure Data both to Midi Through and to FluidSynth):


Then, in step 1 (by clicking the toggle "To get notes from keyboard") and "Initialize list", we enter the notes of a melody, without worrying about rhythm or velocities. Then, in step 2, by selecting the other toggle (without a name), the notes will be played in the order of the notes just recorded, regardless of which keys I press, but recording their rhythm and velocities. A mini-demo can be seen below (also uploaded to https://vimeo.com/57762697):


If I send that to, for example, MusE, the resulting score is quite different to the original score, but it has the rhythm and the velocities as entered in the second step:


Then, the tweaks to do are much less than for my original setting, and it involves writing chords, and perhaps changing a few note durations using the piano roll.

This is certainly a big improvement in my MIDI recording from my previous ways.


Tuesday 15 January 2013

Virtual machine with persistence in VirtualBox

Now that I have a nice Multiboot USB stick (http://angel-de-vicente.blogspot.com.es/2012/11/multi-boot-usb-stick.html), I have been asked a couple of times to show it to someone. This involves re-booting a machine, so I looked for a way to try one of the distros installed in the USB inside VirtualBox. This is only a quick hack, and there is plenty of room for improvement, but it worked OK (with ideas from https://help.ubuntu.com/community/LiveCD/Persistence).

The steps were:

1.- Create a new virtual machine (with 8GB of hard disk in a .vdi file), and attach to it the xubuntu CD.


2.- Create an ext3 partition in the .vdi file (the virtual machine's hard disk) and label it casper-rw:


3.- Try it.

When starting the virtual machine, type F6 to get into the LiveCD options, then with F6 again, include "persistent". (Also useful to change the keymap with F3). Every time we want to access the persistent partition, we will need to add "persistent" to the boot options (there are ways to modify the .ISO file so we don't need to do this, but I'm only using this option rarely, so it is not worth it).


4.- Transfer one of my LiveCD with persistent file to the VirtualBox.

Since this is almost only for demo purposes of my multiboot stick, when I don't want to reboot a PC, I want to be able to load one of my existing LiveCD distros (which use a casper-rw file instead of a casper-rw partition) in VirtualBox (somehow I only got the persistent mode to work inside VirtualBox with a casper-rw partition, not with a casper-rw file as I do it now with the Multiboot USB stick).


At my desktop I have the casper-rw file with all the required modifications at: /home/angelv/Desktop/xubuntu-casper-rw


I start Xubuntu in VirtualBox (without the persistent option), and then I want to copy the contents of the casper-rw file into the casper-rw partition. If you have shared folders or USB support for VirtualBox this is easier, but since I don't right now, I just do it through ssh to the VirtualBox host (192.168.1.12 in my case).


That's it. Now we have a copy of our LiveCD with the persitent changes, that we can use from within VirtualBox.

(In my case, and to match the experience in my Multiboot USB stick, I not only add persistent to the boot options, but I add: persistent hostname=nomada username=angelv userfullname=AngeldeVicente)


Wednesday 9 January 2013

Classical guitar progress logging (Jan'13)

I restart the monthly recordings in order to see my progress with the guitar. The settings to record with my Aria Sinsonido guitar are explained in: http://angel-de-vicente.blogspot.com.es/2013/01/settings-for-recording-guitar.html

The piece for this month is September, by Robin Pearson, and the video is here.

September, by Robin Pearson from Angel de Vicente on Vimeo.

Settings for recording a guitar performance

I just decided to write my current settings for recording a guitar performance in my Ubuntu Studio 12.10 distribution.

For capturing video I use a Live! Cam Chat HD de CreativeHD 720p which can manage 30 frames per second (this webcam comes with an incorporated microphone, so for simple tests, this is perfect and I can record both video/audio with vlc: open capture device (capture mode: Video for Linux 2, video device:  /dev/video0, audio: hw:1,0).

But most of the time I will want to get a different audio track, and then to post-process the video slightly. This is not very elegant but sort of works: I open Audacity and VLC at the same time. I start recording audio with Audacity (before opening the media capture with VLC, otherwise it gets stuck), then I start recording video with VLC. Once finished, I can apply one of the plugin effects in Audacity (most likely just a gentle reverb) and then export the Audacity audio to an MP3 file (the video captured with VLC goes by default to the Videos folder), and then I need to synchronize them.

To get the audio and video synchronized I use Kdenlive (0.9.2, and I set the default profile as Video4Linux). But I need to preprocess the video from my webcam, since it gets all broken when imported into Kdenlive. To get it right, when importing a new clip I first transcode it to HD720p 23.976fps (for 60 Mb/s). After this I get a .mov file, which can be loaded fine in Kdenlive.

Then I just load the .mp3 file from Audacity, the .mov file created above, and  I synchronize them (I do it manually with a visual cue, though Kdenlive has options for "Set audio reference", and "align with audio reference", which I should investigate). I apply basic effects fade-from-black, fade-to-black, fade-in, and fade-out, and I also add a basic title (any odd picture serves as background image, and nice fonts are Coolvetica).

Then I just choose the option to render to MPEG-4, which does a good job, the file created is small, and there are no audio lag issues that I notice with either Movie Player, VLC or Xine.

The resulting .mp4 file can be uploaded to Vimeo, and the result is also fine, with no apparent big audio lag issues.

Tuesday 8 January 2013

Creating a MIDI part for duet practice

I wanted to get a decent-ish silicon partner to play a guitar duet, so I ended up with the following steps:

1.- Enter the basic music score

The first step is to get the music score for the second voice in the computer. I could either enter the "perfect" score and then tweak for some rhythmic/melodic changes or the other way around. I'm not a keyobard player, so the second option is out for me, though this is easy with, for example, MusE, where I can get a "live" MIDI stuff recorded, and then I could fix errors. In my case, better to start with a "perfect" score and then try to add some rhythmic/melodic changes.

So, to get the score in MIDI format I found that a pretty fast option is to use Denemo (to get the MIDI keyboard working, you probably have to follow the steps in http://www.denemo.org/Using+a+Midi+Keyboard). For a first version of the MIDI file I will need only the JACK server and Denemo. Denemo launches its own FluidSynth, so we don't need another one. The only thing we need is to connect the output of the LPK25 to that FluidSynth instance, as in:


With this in place, entering the score is a piece of cake. We do in in two steps: first we enter the rhythm, by using the PC keyboard: to enter notes of different durations we just press the numbers from 0-7, and to enter rests of the corresponding durations Alt+[0-7]. With this, we have a score with the same note, but with the right durations, something like:


Once that is done, we can move to the beginning of the score, and with the help of the MIDI keyboard enter the actual notes. You don't need to enter them accurately in time, just enter them as you can, and Denemo will place them consecutively to match the previously entered rhythm pattern. At the end, we get something like:


In order to better control the duration (and later on the volume) for the bass and the melody lines, I prefer to enter them as separate MIDI tracks. Otherwise (or to enter chords), you can enter various notes by pressing the Alt key in the PC keyboard.

My final alpha-score looks now like:


In order to add some dynamics, I export it as a MIDI file. Denemo has been nice to use, but we don't need it anymore. Now we open Qsynth and Rosegardend, connect them appropriately, import the MIDI file, and now we have a basic version of the duo part that we can tweak with Rosegarden. 

2.- Add some dynamics in Rosegarden

Getting a polished MIDI file is quite a lot of work, but as a minimum we should be able to make some tempo changes, and some crescendos, diminuendos, etc. All of this can be done with Rosegarden.

First of all, we transpose it 12 semitones down, to get to the real frequency of the guitar. Then each track can have different volume levels, and we usually add some reverb:


Then, from the Notation Editor window, we can add crescendos and diminuendos, and by looking at the velocity editor below, we can also stress and silence individual notes at will:


And by using tempo changes, we can use different tempos, tempos that ramp up gradually to the next tempo, sudden tempo changes, etc., in order to make it sound more musical:


Now, for practice, I would like to take this music and slow it down, and slowly get to the final playing speed. If you only have on tempo in the whole composition, then that is not a problem as you can just change the tempo to apply to the whole piece and that's it. But if you made several tempo changes, then we need some other way. Not very elegant, but you can use the Segment-> Stretch or Squash option. First, start with a very low tempo, one that would be OK for practice, then when the piece is finished, you can use Stretch or Squash applied to all the tracks at the same time, so you can make it play faster than the original (I think that you cannot make it slower than the original time of the composition, hence the advice to set the initial tempo at practice speed. Probably you can get around this by adding empty extra bars at the beginning, so Rosegarden will have room to stretch the notes, but I haven't tried this).


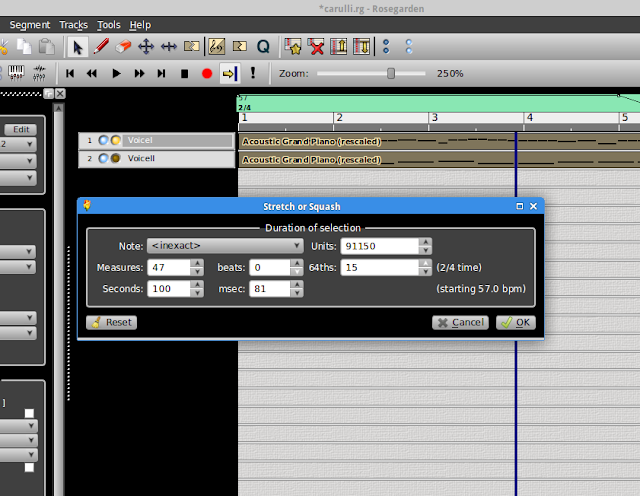
As I said, this solution is not very elegant, since after applying it, then you will see that the tempo has not changed, but all the notes have been squashed together to occupy a smaller number of bars. Now, if you try to use the Metronome or see the score in the Notation Editor you will not like it, but if you work only with the slow tempo until you are satisfied with the result, and then just use the squashing option to play faster as your skill progresses, then this should be enough. But I'll be in the lookout for a better way to do this.

So that's it. With this in place, I can now play together with Rosegarden, and when I'm ready I can route it to Ardour (for example), and mix it with my own guitar input to get a final silicon-human duet.